Menambahkan Host di Nagios Core 4 (Server, Router, Printer)

Nagios Core 4 dapat memonitoring host-host seperti server, router, switch, printer dan network periperal lainnya. Sebelum menambahkan host ke dalam nagios core 4, anda harus melakukan konfigurasi dasar nagios core 4 untuk menentukan objek-objek yang akan diaktifkan di file konfigurasi nagios. Setelah itu, anda juga harus membuat hostgroups nagios untuk mengelompokan host-host nagios berdasarkan jenis perangkat.
Kita akan mengambil contoh membuat 6 host yang terdiri dari group host yang berbeda-beda. Sebelumnya kita sudah membuat host group yaitu Windows Server, Linux Server, Router, Switch, Access Point dan Printer. Sekarang mari kita buat host untuk masing-masing host group tersebut.
Langkah 1 : Membuat File Konfigurasi Objek
Kita akan membuat beberapa file konfigurasi yang nanti akan kita isi sebagai host di nagios. Buat 3 file kosong di folder /etc/nagios masing-masing beri nama server.cfg , router.cfg, printer.cfg .Keterangan :
Pada artikel konfigurasi dasar nagios core 4 saja sudah menjelaskan cara menghubungkan objek-objek nagios ke dalam file konfigurasi nagios core 4. Buka dengan menjalankan perintah nano /usr/local/nagios/etc/nagios.cfg . Kemudian daftarkan file-file pada langkah satu seperti gambar dibawah ini :
- server.cfg akan diisi host seperti server linux, windows server, virtual machine.
- router.cfg akan diisi host seperti router, switch, firewall, access point dll.
- printer.cfg akan diisi host khusus printer yang konek ke jaringan.
Langkah 2 : Daftarkan Objek ke File Konfigurasi Nagios
Pada artikel konfigurasi dasar nagios core 4 saja sudah menjelaskan cara menghubungkan objek-objek nagios ke dalam file konfigurasi nagios core 4. Buka dengan menjalankan perintah nano /usr/local/nagios/etc/nagios.cfg . Kemudian daftarkan file-file pada langkah satu seperti gambar dibawah ini :Setiap kali kita membuat file objek untuk host, service maupun command, harus didaftarkan ke file konfigurasi nagios core 4.
Langkah 3 : Menambahkan Host di Nagios 4 (Router, Switch dan Access Point)
Buka file /etc/nagios/router.cfg . Anda bisa menggunakan ftp client seperti FileZilla agar lebih mudah dalam pengeditan. Tambahkan 3 host seperti contoh dibawah ini. Sesuaikan parameternya seperti nama host, alamat IP dan hostgroups.#Router ISP
define host{
use generic-router
host_name GN-003 Kyrios Neo
alias GN-003 Kyrios Neo
address 192.168.97.97
check_command check-host-alive
check_period 24x7
notification_interval 0
notification_period 24x7
notification_options d,u,r
icon_image router.png
statusmap_image router.png
hostgroups router
}
#CHR
define host{
use generic-switch
host_name GNY-001 Astraea
alias GNY-001 Astraea
address 172.17.11.27
check_command check-host-alive
parents GN-003 Kyrios Neo
check_period 24x7
notification_interval 0
notification_period 24x7
notification_options d,u,r
icon_image ng-switch40.png
statusmap_image ng-switch40.png
hostgroups switch
}
#AP HO
define host{
use generic-router
host_name GNMA Alvatore HO Off Neu
alias GNMA Alvatore HO Off Neu
address 192.168.97.189
parents GN-003 Kyrios Neo
check_command check-host-alive
check_period 24x7
notification_interval 0
notification_period 24x7
notification_options d,u,r
icon_image wifi_modem.png
statusmap_image wifi_modem.png
hostgroups access-point
}Anda bisa menentukan parents atau host tersebut berada dibawah host mana yang ingin ditentukan.
Langkah 4 : Menambahkan Host di Nagios 4 (Server Linux dan Windows)
Buka file /etc/nagios/server.cfg . Kita akan menambahkan contoh dua host yaitu server linux dan server windows. Sesuaikan parameternya seperti nama host, alamat IP dan hostgroups.#IT-LAB
define host{
use linux-server
host_name IT-LAB
alias IT-LAB
address 192.168.99.135
check_command check-host-alive
parents GN-003 Kyrios Neo
notification_period 24x7
notification_options d,u,r
icon_image pve.png
statusmap_image pve.png
hostgroups linux-server
}
#Sunfish
define host{
use windows-server
host_name Sunfish
alias Sunfish
address 192.168.99.238
check_command check-host-alive
parents GN-003 Kyrios Neo
notification_period 24x7
notification_options d,u,r
icon_image windows.png
statusmap_image windows.png
hostgroups windows-server
}Langkah 5 : Menambahkan Host di Nagios 4 (Printer)
Printer yang akan kita tambahkan di host nagios adalah printer yang terhubung ke jaringan seperti HP LaserJet P2055 DN. Jika printer yang anda punya tidak mendukung konektivitas jaringan, anda bisa memanfaatkan perangkat Print Server.Buka file /etc/nagios/printer.cfg . Kita akan menambahkan contoh host untuk printer jaringan. Sesuaikan parameternya seperti nama host, alamat IP dan hostgroups.
#Printer PIPC
define host{
           use                    generic-printer
           host_name              HP 2055DN Nora
           alias                  HP 2055DN Nora
           address                192.168.98.167
           parents                GN-003 Kyrios Neo
           check_command          check-host-alive
           check_period           24x7
           notification_interval  0
           notification_period    24x7
           notification_options   d,u,r
           icon_image             hp-printer40.png
           statusmap_image        hp-printer40.png
           hostgroups             printer
}
Terakhir restart servis nagios dengan perintah systemctl restart nagios.
Catatan :
Anda bisa menentukan icon_image dan statusmap_image kedalam parameter host. Gambar ini nanti akan muncul di antarmuka web nagios. Sesuaikan icon gambar dengan jenis perangkat untuk memudahkan saat monitoring host.
Anda bisa memilih gambar yang disediakan nagios yang berada di folder /usr/local/nagios/share/images/logos. Anda juga bisa menambahkan gambar icon sendiri di folder tersebut.
Demikianlah cara menambahkan host di nagios core 4. Parameter yang kita tambahkan pada contoh host diatas merupakan paling dasar. Yaitu dengan melakukan pengecekan host berdasarkan alamat IP. Apabila IP bisa di PING maka status host menjadi UP, begitu pun sebaliknya.
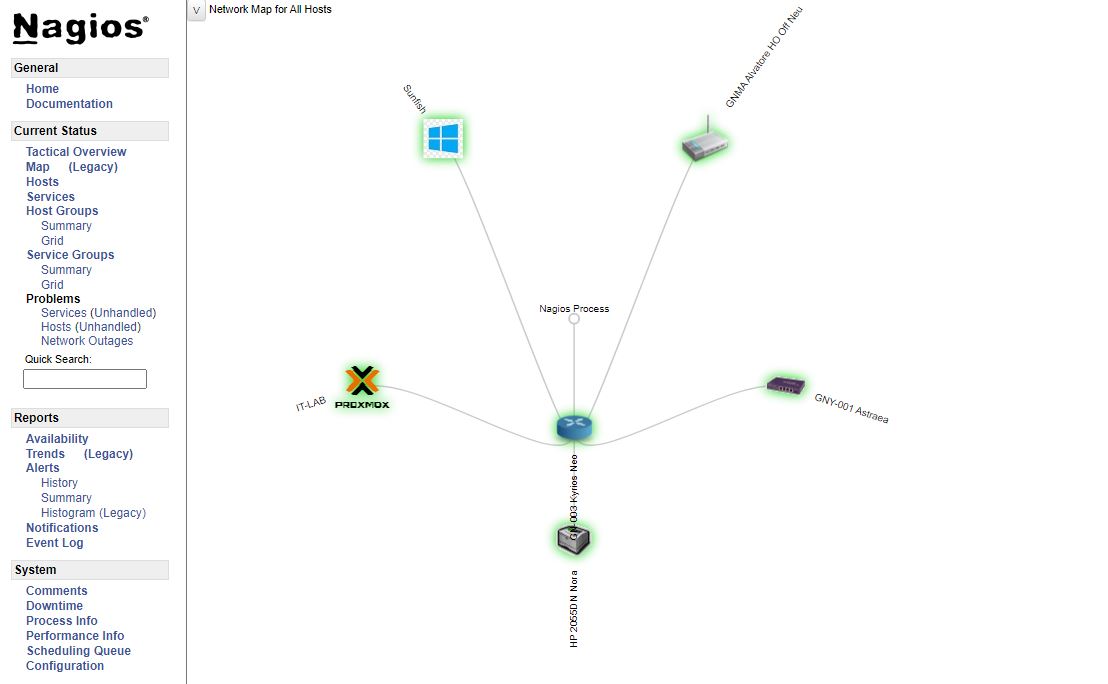
Buka antarmuka nagios web dengan mengakses http://alamat_ip/nagios. Kemudian pilih menu Map untuk melihat hirarki host yang telah kita tambahkan.

Pada artikel selanjutnya kita akan membahas lebih lanjut mengenai monitoring host di nagios yaitu Services dan Commands.


